Protecting services with client certificates using Haproxy
What we want to achieve #
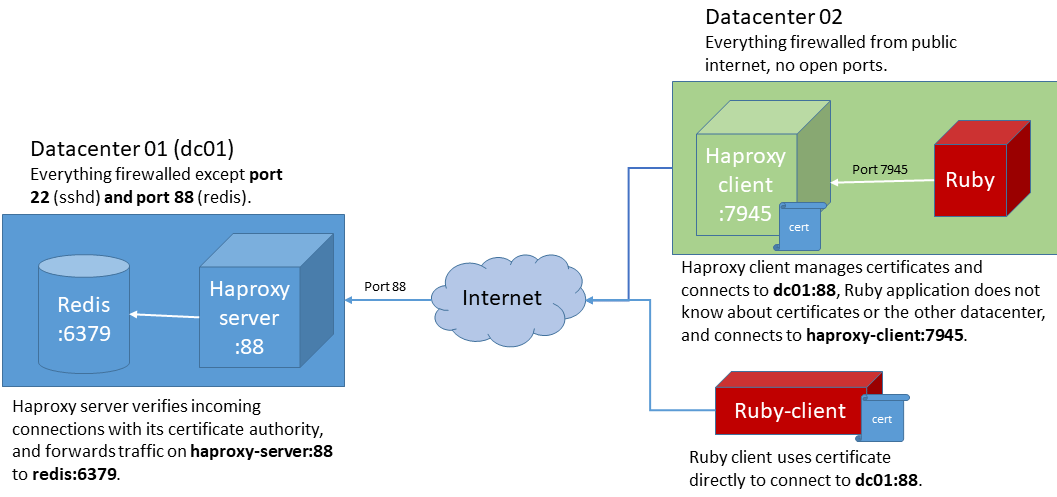
We want to be able to connect to services inside a private network using client certificates, in this example we will be connecting to Redis.
Install or compile Haproxy #
I am using Debian, so this is what I use to compile Haproxy for testing out this setup.
apt-get -y install make gcc g++ libssl-dev

wget http://www.haproxy.org/download/1.8/src/haproxy-1.8.4.tar.gz
tar xzf haproxy-1.8.4.tar.gz
cd haproxy-1.8.4
make TARGET=generic USE_OPENSSL=1
make install PREFIX=/usr/local
Install and configure firewall #
I am testing with a Redis-server, but it can be anything. First firewall off everything except for port 22 (ssh) and port 88 (our external redis port):
apt-get -y install ufw

ufw default deny incoming
ufw default allow outgoing
ufw allow 22
ufw allow 88
Install Redis #
apt-get -y install redis-server
Since Debian and Debian-related distros have the terrible idea that software need to run by default, you should now have a running redis-server on port 6379.
Generate certificates #
This is just for testing, please use some better tooling like easy-rsa to manage your certificates:
# MASTER CERTS:
openssl genrsa -nodes -out ca.key 4096
openssl req -new -x509 -days 3650 -key ca.key -out ca.crt # with cname=haproxytest.kaspergrubbe.com
cat ca.crt ca.key > ca.pem

# CLIENT CERTS:
openssl genrsa -out client.key 4096
openssl req -new -key client.key -out client.csr # FQDN=client.kaspergrubbe.com
openssl x509 -req -days 3650 -in client.csr -CA ca.crt -CAkey ca.key -set_serial 01 -out client.crt
cat client.crt client.key > client.pem
Setup Haproxy server #
This let Haproxy listen on port 88, and it will verify the connecting certificates, and if the authentication is succesful, it will forward the traffic to redis on 127.0.0.1:6379.
Create a file named: haproxy_server.cfg:
global
  pidfile /var/run/haproxy.pid
  maxconn 4000
  tune.ssl.default-dh-param 2048

listen redis
  bind 0.0.0.0:88 ssl crt /root/ca.pem ca-file /root/ca.crt verify required
  mode tcp
  server redis-1 127.0.0.1:6379 maxconn 1024
Run the config in a non-daemonized way:
haproxy -f haproxy_server.cfg.
Connecting to Redis through another Haproxy #
Create a file named: haproxy_client.cfg:
global
  pidfile haproxy.pid
  maxconn 4000

listen redis
  bind 0.0.0.0:7945
    mode tcp
  server redis-serv01 haproxytest.kaspergrubbe.com:88 ssl crt client.pem ca-file ca.crt
Run the config in a non-daemonized way:
haproxy -f haproxy_client.cfg.
Now you should be able to connect to Redis from your terminal:
$ redis-cli -h localhost -p 7945
localhost:7945> ping
PONG
Connect to Redis through Ruby #
If you do not want to install a Haproxy instance just to manage the client certificates, you can connect directly from your favorite programming language, here is an example on how to do it in Ruby:
require 'socket'
require 'openssl'

sock = TCPSocket.new('haproxytest.kaspergrubbe.com', 88)

ctx = OpenSSL::SSL::SSLContext.new
ctx.cert = OpenSSL::X509::Certificate.new(File.read('/root/client.pem'))
ctx.key  = OpenSSL::PKey::RSA.new(File.read('/root/client.key'))
# ctx.key = OpenSSL::PKey::RSA.new(File.read('client.key'), 'secret_password')

@socket = OpenSSL::SSL::SSLSocket.new(sock, ctx).tap do |socket|
  socket.sync_close = true
  socket.connect
  socket.write "PING\n"
  socket.each_line do |line|
    puts line
  end
end
Todo: #
Consider using CRL-files for making your life easier, CRL stands for Client Revocation List, and it is a list of certificates that you no longer trust for one reason or another, so if a server gets hacked, or an employee laptop goes missing, you can revoke the certificate and sleep nicely afterwards knowing that they can’t use the certificate for anything.
When you have a crl-file, It is as easy as adding crl-file <crlfile> to the server configuration.
There is a nice article about crls here: https://jamielinux.com/docs/openssl-certificate-authority/certificate-revocation-lists.html